Friday, July 29, 2016

Christmas in July Blog Hop: Day 5

Christmas in July continues with a week of holiday-themed tutorials! Stop by each day this week to see the featured tutorial and find out how you can enter to win the fabric line being used!

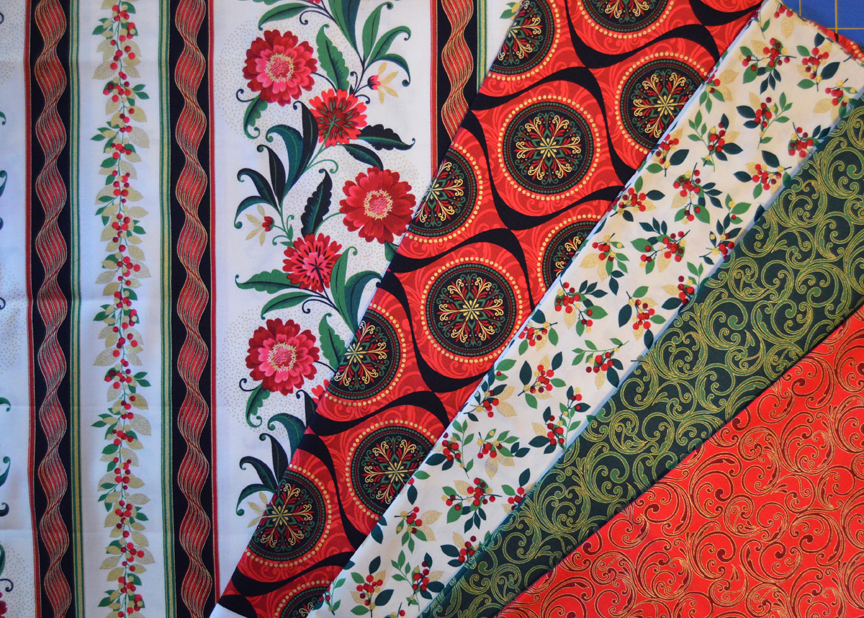
Today we're featuring a table topper tutorial using Maria Kalinowski's Joyful collection. Rich red, deep green, black, cream and metallic accents--this line is certainly full of joy! It has a fun stripe for fussy-cutting, but we think the star of the show is the print we've used in the outer border. 

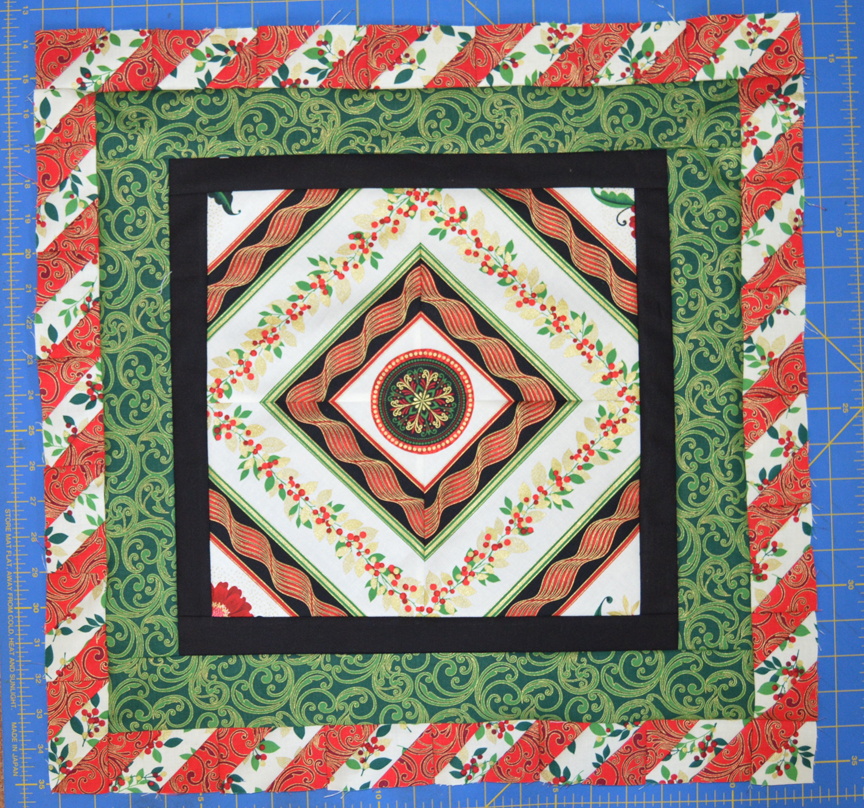
Table topper measures 33" square

A closer look at the fabrics used:

Materials:
1/4 yard floral stripe
1/4 yard green scroll
1/3 yard red scroll
1/4 yard cream berry
3/4 yard red/black ornament print
2/3 yard black solid (includes binding)
1-1/4 yards backing fabric
39" square of batting
4" square of fusible web

Cutting:
From the floral stripe:
Fussy-cut (4) 6-1/2" squares, centering the berries and leaves as shown


From the green scroll:
(2) 2-1/2" x 42" strips; recut into (2) 2-1/2" x 18-1/2" strips and (2) 2-1/2" x 14-1/2" strips

From the red scroll: 
(1) 2-1/2" square
(3) 2" x 42" strips; recut into (50) 2" squares

From the cream berry:
(1) 2-1/2" square
(2) 2" x 42" strips; recut into (25) 2" x 3-1/2" pieces

From the red/black ornament print: 
Fussy-cut (4) 5-1/4" x 23-1/2" strips as shown

From the black solid: 
(1) 5-1/4" x 42" strip; recut into (4) 5-1/4" squares
(4) 2-1/4" x 42" strips for binding
(4) 1-1/2" x 42" strips; recut into (2) 1-1/2" x 23-1/2" strips, (2) 1-1/2" x 21-1/2" strips, (2) 1-1/2" x 14-1/2" strips, and (2) 1-1/2" x 12-1/2" strips

Make the Table Topper:
Step 1: Sew the (4) 6-1/2" fussy-cut squares together in pairs, aligning the fabric design, and then join the pairs to create the quilt center. 


Step 2: From the remaining red/black ornament print, loosely cut out around a medallion shape. Following manufacturer's directions, adhere fusible web to the back of the medallion and cut out neatly around shape. 


Step 3: Fuse to the middle of the quilt center. 


Step 4: Sew the 1-1/2" x 12-1/2" black strips to the sides of the quilt center. Sew the 1-1/2" x 14-1/2" black strips to the top and bottom. 


Step 5: Sew the 2-1/2" x 14-1/2" green scroll strips to the sides of the quilt center. Sew the 2-1/2" x 18-1/2" green scroll strips to the top and bottom. 

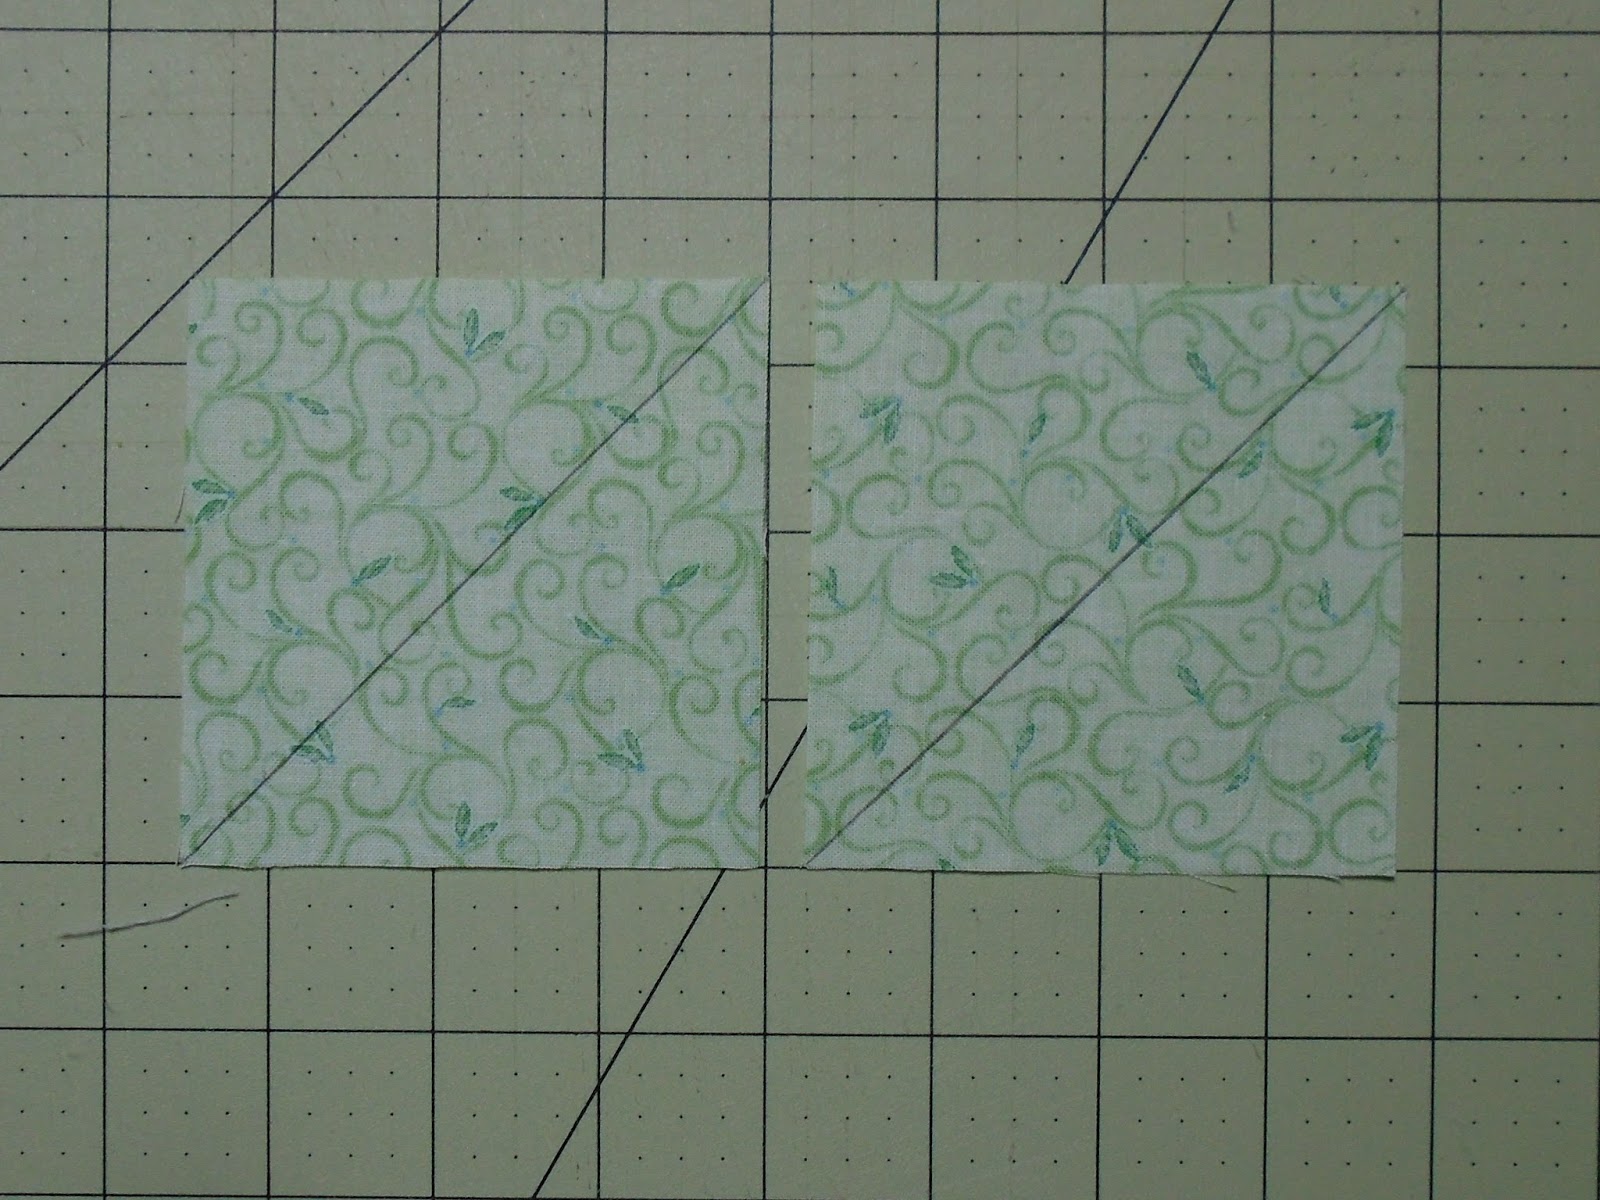
Step 6: Draw a diagonal line on the wrong side of all the red scroll squares. 
Step 7: Lay the marked 2-1/2" red scroll square right sides together on the 2-1/2" cream berry square. Sew 1/4" on either side of the marked line. Cut on the line and press each half-square triangle unit open. Trim to measure 2" square. 


Step 8: Lay a marked 2" red scroll square right sides together on the left side of a 2" x 3-1/2" cream berry piece. Sew on the drawn line, trim 1/4" past the seam, and press open. 

Step 9: In the same way, position a marked square on the right end of the cream berry piece so the line is parallel to the first seam line. Sew on the line, trim, and press open. 

Step 10: Make a total of (13) right-angled stripe units with red in the upper left and lower right corners. 

Step 11: In the same way, position a marked square on the right side of a 2" x 3-1/2" cream berry piece as shown, sew and press. Repeat on the left corner, making sure the seams are parallel. Make a total of (12) left-angled stripe units. 


Finished right-angled stripe unit (top--make 13) 
and left-angled stripe unit (bottom--make 12)


Step 12: We'll be adding the border one side at a time to create the stripe pattern and avoid using partial seams. Start with the right side border: Sew together (6) left-angled stripe units as shown and then join to the right side of the quilt top. 


Step 13: For the bottom border, Sew together (6) right-angled stripe units and then add a HST to the right end. Sew to the bottom of the quilt top. 


Step 14: To make the left side border, sew together (6) left-angled stripe units and then add a HST to the top. Sew to the left side of the quilt top. 


Step 15: To make the top border, sew together (7) right-angled stripe units and add to the quilt top. 


Step 16: Sew 1-1/2" x 21-1/2" black strips to the sides of the quilt. Sew 1-1/2" x 23-1/2" black strips to the top and bottom. 


Step 17: Sew 5-1/4" x 23-1/2" red/black ornament print strips to the sides of the quilt. Sew 5-1/4" black squares to both ends of the remaining two strips and sew to the top and bottom of the quilt. 

Step 18: Layer the quilt top with batting and backing, baste, and quilt as desired. Use the (4) 2-1/4" x 42" black strips to bind the table topper. Enjoy!


For a chance to win a fat quarter bundle of Joyful, make sure you're following our blog! Leave a comment letting us know that you are, as well as letting us know if you've started any Christmas sewing yet. Giveaway is open through Tuesday, August 2nd at 11:59 pm EST; U.S. addresses only, please. 


Don't miss our Christmas in July tutorials all this week!
Wednesday: Alison from Little Bunny Quilts, featuring Sparkle
Friday: Benartex blog design team featuring Joyful
Love It? Share It! Facebook Twitter Google Pinterest Email

Thursday, July 28, 2016

Christmas in July Blog Hop: Day 4

Christmas in July continues with a week of holiday-themed tutorials! Stop by each day this week to see the featured tutorial and find out how you can enter to win the fabric line being used!

Today Cynthia from Quilting is more fun than Housework (and yes, it is!) is sharing the perfect quick and easy gift idea for the holidays. She's made double-sided napkins using the Holiday Cheer collection by Maria Kalinowski for Kanvas. These novelty prints are sew much fun!


Here's Cynthia:
Welcome to my stop on the Benartex Christmas in July Blog Hop.  Benartex has so many fun collections coming out for the holidays it was hard to choose a favorite.  But when I saw the Holiday Cheer collection, I immediately had the perfect project in mind.


Bright colored candies and cocktail treats....This collection was screaming to be made into party napkins!  They are pretty easy to make so I thought I would include a tutorial in case you want to get started on your holiday sewing.


The first step is to get the fabric pre-washed (to remove shrinkage) and then pressed.  I use either starch or a starch alternative like Best Press to get it really nice and flat.


 You will want to remove the selvages and square up the pressed fabric to the size you desire.  
 
When cutting your fabric to size, you will need to compensate for the 2.5" you will lose in the finished edging. For my 14" napkins, I cut a 16.5" square.


 At your ironing board, fold down 1/4" and press to the wrong side around all 4 sides of the cloth..  I use a small ruler to help with this.  
You can also mark your fabric with a light pencil line on the wrong side if that is easiest to follow.  
(Using Best Press on this step will help to ensure the fold doesn't open up in handling.)


  Next, with the 1/4" still pressed down, you will fold in and press an additional 1" on all 4 sides of the cloth.  Once again, the use of starch or Best Press will keep the folds from opening up.


On a flat surface, open up the 1" fold but keep the 1/4" fold, down.  In the corners, draw a line at 45 degrees through where the fold marks intersect.  I use the 45 degree mark on my ruler to line up with either the edge of the cloth or the fold mark.  Remember to mark all four corners.


Now fold the corners right side together (keeping the 1/4" folded down).  The outer edge of the cloth should be lined up and come to a point. Sew on the pencil line, remembering to back stitch at the beginning and end of the stitch line.  Sew all four corners.
 
Trim the corner about 1/4" from the stitched line.  I may also trim away some of the bulk at the corner where the fold is to help keep the points sharp.
 Now just fold in and you will get a nice mitered corner with a sharp point.  I use one of my cutting rulers to slide into the point to push them all the way out.  Give all the edges another press.


At this point, you can choose not to line your napkins and just top stitch around the mitered edge (see below) - or you can get even more festive and line your napkins with a coordinating fabric.


I cut a 13" square and tucked it under the mitered edge.  I then pinned all the layers around the edge to make top stitching a little easier.
 
In a nice contrasting or complimentary thread (your choice), stitch along the inside fold about 1/16" from the edge.  Remember to backstitch when you start out.  To turn the corners, put the needle down right in the miter, lift the presser foot and turn. I also backstitch at the end.
And there you have it - fun holiday napkins!


Perfect little gifts for that favorite hostess...


 Or put them away for use at your own holiday party.  
Aren't the prints adorable in this Holiday Cheer collection!

Thanks, Cynthia! Head over to Cynthia's blog to enter for a chance to win a FQ bundle of Holiday Cheer fabric! 

Don't miss our Christmas in July tutorials all this week!
Wednesday: Alison from Little Bunny Quilts, featuring Sparkle
Friday: Benartex blog design team featuring Joyful


Love It? Share It! Facebook Twitter Google Pinterest Email

Wednesday, July 27, 2016

Christmas in July Blog Hop: Day 3

Christmas in July continues with a week of holiday-themed tutorials! Stop by each day this week to see the featured tutorial and find out how you can enter to win the fabric line being used!

Alison from Little Bunny Quilts chose the Sparkle collection by Amanda Murphy and stitched a festive tree skirt ringed with star blocks.


Here's Alison:
Hello! I'm Alison from Little Bunny Quilts and I'm sharing a fun tutorial for a tree skirt using Amanda Murphy's Sparkle line! Let's get started!


You will need:

2 yards of a background fabric
Various print fabrics (I used parts of fat quarters, but you could use scraps!)
2.5 yards backing fabric
0.5 yards for binding

It is also helpful to have a larger 30 degree ruler. I own and used this ruler, which I highly recommend (NOT an affiliate link!).

From your background cut:

Twelve (12) 30 degree wedges 13 inches long


Three (3) 12 inch squares -- cut each in half diagonally twice for twelve (12) triangles
Twenty four (24) 3 inch by 6.5 inch rectangles
Forty Eight (48) 2.5 inch squares
Twelve (12) 3.5 inch squares

From your print fabrics cut:

Twelve (12) 2.5 inch squares total (can be all different fabrics!)
Thirty six (36) 3.5 inch squares total -- you will need twelve pairs of matching squares (see below)

Making your Ohio Star blocks (Make 12 Ohio star blocks)

For each star you will need:
Four (4) 2.5 inch background squares
One (1) 3.5 inch background square
Two (2) matching 3.5 inch print squares
One (1) contrasting 3.5 inch print square
One (1) 2.5 inch print square


Draw a diagonal line on each of your matching 3.5 inch squares.


Pair one with a background fabric square, pair the other with your contrasting 3.5 inch square. Sew on each side of the line, cut apart on the line, and press towards your matching square fabric.


Cut each HST unit in half diagonally perpendicular to the seam you just sewed.


Pair half units together so that each QST unit has two matching side triangle, one background triangle, and one contrasting triangle. Trim each unit to 2.5 inch squares.


Lay out your star as shown below, sew into an Ohio star block -- make sure that your points are all pointing in the correct directions.


Making your wedges

Now that your stars are completed, sew the following to each star:
-- sew a 3 x 6.5 inch rectangle to the right and left of the star block
-- sew a 30 degree wedge piece to the top of the star block
-- sew a 12 inch triangle piece to the bottom of the star block

Using the lines of your 30 degree wedge piece, trim the sides of your wedge unit so that the entire unit is a large 30 degree wedge with a point at the outer edge as shown below.


Putting it all together

Lay out your twelve wedges in the order that you desire them. Sew wedges together in sets of 3 to begin. You now have four "quadrants" to easily sew into pairs, and then finally sew two halves together.


NOTE: You do not need to worry about all of your points lining up in the center since we will be cutting a hole in this area! Whew!


Once your top is all together, quilt as desired. I quilted mine with loops in each wedge. At this point, you can choose to trim your tree skirt into a circle as I have or you can choose to leave your wedges with points. Trace around a circular object (I used a can of vegetables) to define your inner circle opening for your tree trunk. Choose one of your wedge seams and cut up the length of the seam to your drawn circle and cut the circle out. If trimming into a circle, make marks 20 inches from your center around the edge of your quilt and cut along those marks.


Now you are ready to bind and add your choice of ribbons, buttons, or hooks-and-eyes to keep the opening of your tree skirt shut during the Christmas season!


Thanks for letting me share this tutorial with you today and don't forget to stop by Little Bunny Quilts for your chance to win!

Thanks, Alison! Head over to Alison's blog to enter for a chance to win a FQ bundle of Sparkle fabric! 


Don't miss our Christmas in July tutorials all this week!
Wednesday: Alison from Little Bunny Quilts, featuring Sparkle
Friday: Benartex blog design team featuring Joyful

Love It? Share It! Facebook Twitter Google Pinterest Email